Every time you are at port of entry in US, it is a very long wait for the immigration process and takes forever for the CBP officer to speak to you and let you go. Recently, my experience entering US on B1/B2 visa at San Francisco Airport was very seamless with the Automated Passport Control (APC) Kiosk. Let me share my experience on how it works for foreigners entering US on B1/B2 visa and who all can leverage the APC kiosks.
What is Automated Passport Control ( APC ) Process in USA ? Kiosks ?
US Customs and Border Protection (CBP) has created the Automated Passport Control (APC) process to help speed up the port of entry immigration and customs process for certain eligible travelers entering USA. It is a self-service process at a kiosk, where travelers would scan passports, visa, and select info so that the time it takes for CBP officer is reduced and users do not have to fill out physical customs declaration forms as well. It is available for US Citizens, Green card holders, Canadian citizens, and users using ESTA ( visa waiver program), B1/B2 or D Visa. APC kiosks are available at major international airports in USA. You can check full list of airports that have APC kiosks and more info at CBP.gov APC
Automated Process Control (APC) Kiosk Experience in USA at San Francisco Airport
Below is the step by step process that you would go through, if you use APC Kiosks.
-
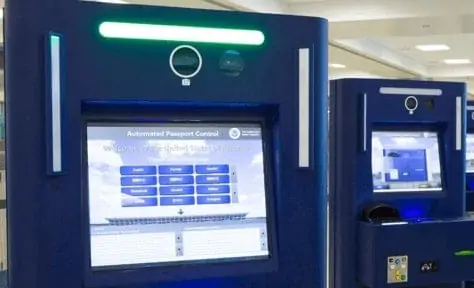
Step 1 – APC Kiosks Line :
Once you arrive at the immigration and customs section at the airport, you will be asked what visa are you planning to use to enter US. If you say B1/ B2 or D Visa, they will ask you to stand in a separate line for APC Kiosks. There are about 20 kiosks in SFO airport.
-
Step 2 – Process at APC Kiosk – Scan Visa, other steps :
Below are the various steps that you need to do at APC Kiosk.
- Select Language : Once you are kiosk, first thing you need to do is select language. You have English, French, Spanish, Korean, Italian, Dutch, , Chinese (Traditional/Simplified), Japanese and German language options available for you.
- Select Type of Document for Entry: You need to select the type of document that you will use for entry to US like Green Card or B1/ B2 visa, etc. check screenshot below

- Scan Visa in Passport / Green Card : You need to scan your B1/B2 visa in passport or green card, depending on what you select. You need to open the US visa page in passport and put in downwards on the glass window as below for the system to scan. Check below screenshot.

- Confirm Details : The system will show your details from your visa, you need to read, review and confirm, if they are correct to proceed. If wrong, you can re-scan again.

- Select Visa Type : It will ask you to enter the visa type. If you are entering for Business, then you select B1. If you are entering for pleasure, then you select B2. Similarly for other types.
- Scan Fingerprints : After this you will be asked to give your finger prints. You need to put in your right hand and left hand ( all four fingers), as shown on the image there.
- Take Photo: Once that is done, you will need to stand in front and it will take photo. If the photo did not come out well, the photo will be taken again. The lights will flash that are in front of kiosk and then picture is taken. You can take out glasses, if it creating reflection issues.
- Customs Declaration : After this, you need to fill US customs Declaration form, it is pretty similar to how you fill standard Paper US Customs Declaration Form . You need to select few boxes and declare by touching a button. No need to type anything.
- Print Receipt with your info from APC Kiosk : After you are done, the APC kiosk will print a receipt with your information on it. It looks like below with visa info that you plan to enter in US ( COA – Class of Admission ), passport info, date of birth, Location info of airport and a code. You will need to give this to the CBP officer.

-
Step 3 – APC Kiosk Receipt Review by CBP Officer :
After you collect the receipt, you will need to stand in a line for a CBP officer to check, speak to you and then let you go to collect bags. They will ask you few questions such as below.
- Automated Passport Control (APC) Questions asked by CBP Officer :
- What is the purpose of your Visit ?
- How long are you are here in US ?
- How often do you Visit US ?
- Where will you stay in US ?
- Where are your meetings ?
- What do you do for work , your role ?
- What company do you work for ?
- When was the last time you entered US ?
- Automated Passport Control (APC) Questions asked by CBP Officer :


Once they are convinced, they will stamp on passport with date and write the visa category you are entering in like B1 or B2 and also it has date until when you can stay in US. See below image for stamp.
-
Step 4 – Collect Bags, Exit :
That’s it after your passport is stamped, you get to leave and collect your luggage bags and exit customs. You do not need to give out anything as you have already filled out your customs form.
That’s about it. It was quite easy, seamless, and no more waiting in the line for long…How was your experience with APC Kiosks at Port of Entry in US ?
Is possible to find potential vendors for these Kiosk?
Richard,
You can contact the CBP, they may be able to help.
If you have a B1/B2 visa with your foreign passport, do they also check for a permanent resident card?
Shekinah,
If the permanent resident card is for the US ( green card), then you don’t need to. If not, you need the visa.